 Colour Cozy
How to use the sand tool, step by step
Hold your finger down, and a little bottle pours colored grains that pile up inside the lines. Here is how to steer it, when an area finishes, and where sand looks best.
In this guide
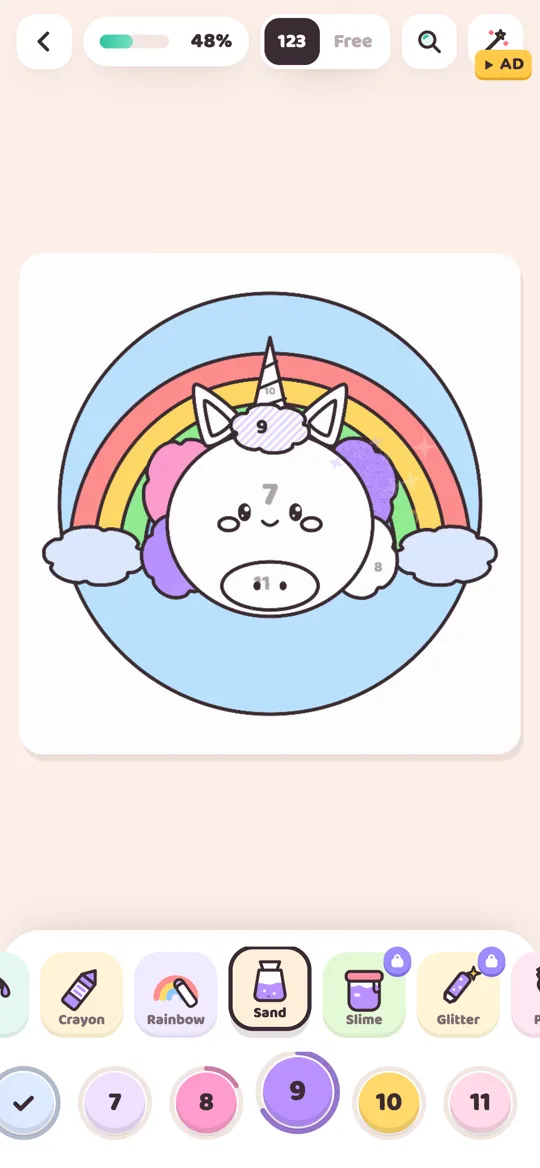
To use the sand tool in Colour Cozy, pick Sand in the tool row, choose a color, then press and hold inside an area. A small bottle tips over your finger and colored grains pour down and pile up, always staying inside the lines. Slide slowly to spread the pile. Once most of the area is covered, the rest fills in by itself with a grainy, speckled finish. Sand is free from the start.
Sand is the tool that feels most like a real craft table. You do not draw a line with it. You pour. That small difference trips people up the first time, because a quick swipe that works with a marker leaves only a thin trail of grains. Once you know to hold and wait, it becomes one of the calmest ways to fill a picture.
This guide covers exactly how the tool behaves, a step-by-step routine, and which parts of a picture suit a sandy texture. If you want the overview of every tool first, read our guide to all 12 Colour Cozy tools.
What the sand tool does
Most coloring tools paint where your finger touches. Sand works more like a real sand bottle:
- It pours while you hold. As long as your finger stays down, a little bottle filled with your chosen color hangs just above it, and grains keep falling.
- Grains land around your finger. They scatter in a small circle and stack up there, so holding still builds one spot and moving spreads the pile.
- It stays inside the lines. Grains only settle in the area where you started pouring. You can pour right up to the edge without spilling into the next shape.
- It has its own texture. Each grain is a slightly lighter or darker shade of your color, so a sanded area looks speckled and grainy rather than flat.
- It has its own sound. A soft pouring sound plays while you hold, and a short rattle of grains plays when an area finishes. The mute button silences both.
Sand is one of the eight tools you can use from the very first picture. It is not a pro tool and needs no video or gems.
How to use the sand tool, step by step
Open any picture, trace the lines to wake it up, and you are ready to pour.
- Find Sand in the tool row. Swipe the row of tools above the colors. Sand sits between Rainbow and Slime and shows a little jar of colored grains.
- Pick a color. In color by number, tap the number you want to fill. In free mode, tap any color you like.
- Press and hold inside one area. Keep your finger still for a moment. You will see the bottle appear and grains start to fall.
- Slide slowly. Move your finger across the area at about the speed you would push a toy car. Fast swipes leave gaps, because the bottle needs time to pour.
- Cover most of the shape. You do not need to hunt for every corner. When most of the area is covered, the rest fills in by itself and the grains sound plays.
- Lift and move on. Lift your finger, pick the next number or color, and pour the next area.

Sand in color by number and free mode
Sand works in both ways of coloring. If you are not sure which suits you, our comparison of color by number vs free coloring walks through both.
In color by number, sand follows the same gentle rules as the other tools. If you press on an area with a different number than the one you picked, the game plays a soft boing and points you to the right color instead of pouring. Areas that are already finished do not take more sand.
In free mode, you can pour any color anywhere. You can even pour over an area you already finished: start pouring with a new color and it refills that shape. This is handy when you change your mind about a background or want to try a lighter shade of sand.
Where sand looks best on a picture
Because sand adds a speckled texture, it shines on parts of a picture that are soft, rough or fluffy in real life. Flat colors next to sanded ones also make the texture stand out more.
- Clouds and fluff. Puffy clouds and a unicorn's mane look soft and dusty with sand.
- Baked and dusted food. Dumplings, cookies and cake crumbs suit a grainy finish. Our food coloring page ideas have palettes that pair well with it.
- Beaches and ground. Sand on sand is an easy win: the shore under a whale, or the dirt under a monster truck's wheels.
- Fur. A bunny or kitty colored in sand looks a little fuzzy.
Where sand works less well: very thin strips and tiny details. The pile lands in a small circle around your finger, so on a narrow shape a smooth tool like Marker is easier. If you do want sand on a small part, pinch to zoom in first so the area is bigger under your finger.

Tips for a neater sand finish
A few small habits make sanded areas look even and full:
- Start in the middle of big shapes. The pile spreads outward, so starting in the center and spiraling out covers the area faster than tracing the edge.
- Pause on empty patches. If you see bare spots, hold your finger over them for a second rather than rubbing back and forth.
- Mix textures on purpose. Use sand on two or three areas and a smooth tool like Fill or Marker on the rest. Contrast is what makes the grains noticeable.
- Pick mid-tone colors. Because grains come in a lighter and darker shade of your color, very pale colors show the speckle gently and medium colors show it clearly. Try both and see which you like.
- Turn the sound on. The pouring sound is part of the fun. If you enjoy it, our article on what ASMR coloring is explains why sounds like this feel so cozy.
Your sand in the timelapse
When you finish the last area, the picture comes alive and plays a timelapse of everything you colored. Sanded areas replay too, so you can watch the grains build up again from the bare outline. You can save that clip and share it. Our guide on how to save and share your coloring timelapse shows the steps.
How it compares with real sand art
Real sand art kits work a little differently. You peel off a section of a sticky sheet, sprinkle colored sand over it, then tap off the extra and move to the next section. It is lovely, and also messy, with sand that ends up on the table and the floor.
The sand tool keeps the pleasant part, choosing a color and watching grains pile up, without the cleanup. It is a nice way to try the look of sand art on a rainy day, and a good warm-up before getting the real kit out.
FAQ
Is the sand tool free in Colour Cozy?
Yes. Sand is one of the eight tools you can use from the start. Only Slime, Glitter, Puffy and Neon are pro tools.
Why does a quick swipe leave only a few grains?
Sand pours while you hold, so it needs a moment in each spot. Press and hold, then slide slowly, and the pile will cover the area.
Can sand spill outside the lines?
No. Grains only land inside the area where you started pouring, so you can pour right up to the outline without spilling into the next shape.
Do I have to cover every bit of the area?
No. Once most of the area is covered with sand, the rest fills in by itself with the same grainy texture and a little grains sound.
Can I use sand in color by number?
Yes. Pick the number, then press and hold inside a matching area. If the number does not match, the game shows you the right color instead of pouring.
How do I turn off the pouring sound?
Tap the sound button to mute the game. The pouring sound and every other sound stop, and the sand tool still works the same way.